14 Feb


Posted By
14/02/2023
0 Comment(s)
1209 View(s)
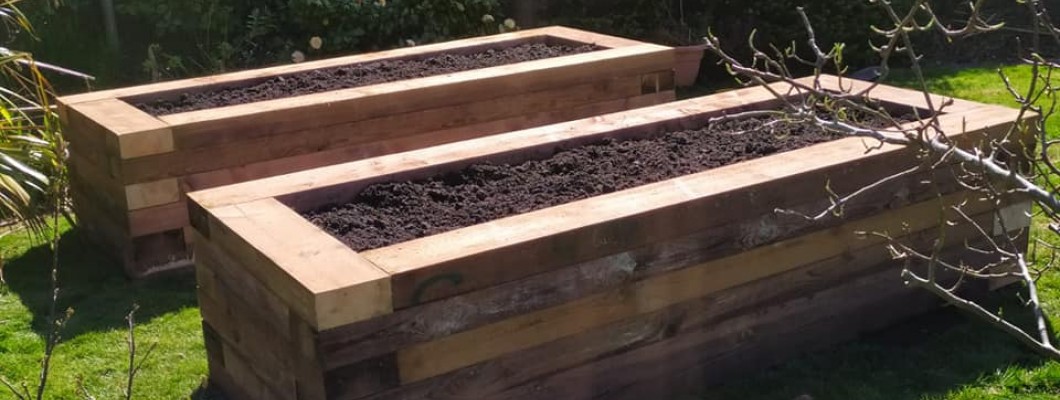
In this step-by-step guide, we’ll take you through the steps to create a beautiful garden planter out of sleepers. From selecting the right materials to putting the final touches on your planter, we’ll provide you with everything you need to know to create a bursting gardeners paradise.
Gardening is a hobby associated with relaxation, bringing a burst of life and beauty to any garden space big or small. One way to add a unique rustic feature to a garden is to build a planter using railway sleepers. These durable, rough-cut long slabs of wood have a natural rustic charm, We offer a great range of options for any garden style.
Sleepers we Offer:
- New Treated Softwood Sleepers (Most Popular)
- Reclaimed railway sleepers (2.4 Meter)
- Reclaimed railway sleepers (1.2 Meter)
- New Oak Sleepers
Materials Needed
- Railway sleepers
- Measuring tape
- Marker
- Saw
- Screws
- Drill
- Sandpaper
- Wood sealant or stain
- Weed Control Fabric
- Potting soil
- Plants of your choice
Step 1: Choose Your Sleepers
The first step in building your planter is to select the appropriate sleeper that fits the size of the plant you plan to put in it. Railway sleepers can be found at any Frank Key Builders Merchants across Nottingham, Sheffield and more. We offer all our sleepers in the standard 2.4-meter length, we also offer 1.2-meter half sleepers that are all 100mm x 200mm.
Ensure that you consider the weight, age and conditions of the sleepers you are using. You want to choose sleepers that are in good condition, without any cracks or rot, so that your planter will be stable and safe.
Step 2: Measure and Cut Your Sleepers
Once you have your sleepers, the next step is to measure and cut them to length. Depending on the overall scale of the planter you want to create, you may need to cut a few of your sleepers in half to make the short sides.
If you are creating a square planter then this step can be missed, most people make rectangular shaped planteers, these require a fair amount of sawing to achieve so ensure you have a good quality saw. When cutting, be sure to wear eye protection and use a saw that is appropriate for the thickness of the sleepers.
Step 3: Sand the Sleepers
After cutting your selected sleepers to the right size, use sandpaper to smooth down any rough edges that could easily give you splinters. This will prepare the cut edges of the sleepers for a protective solution to be applied and also make them safer to handle.
Step 4: Seal or Stain the Sleepers
Alright, it's time to add some flair to those sleepers! If you're all about that natural look, you can give the sleepers a finishing touch with a clear wood sealant. This will keep the sleepers protected from any rough weather that might come their way. But if you're feeling adventurous and want to add a splash of colour to your planter, try a wood stain instead! Not only will this add some personality to your planter, but it will also safeguard against the elements and protect those fresh cuts of wood from rotting away. So what's it gonna be, natural or colourful? The choice is yours!
Step 5: Assemble the Planter
Alright, let's get this planter party started! Grab those sleepers and let's assemble. First up, lay two sleepers side-by-side to form the base. Now, take two more sleepers and attach them vertically to the base using screws. Bam! That's one side of the planter done. Rinse and repeat this process to create the other sides, making sure those corners are nice and square. It's like building a wooden fortress for your plants, and those sleepers are your soldiers. Let's do this!
Step 6: Line the Planter with Weed Sheets
To help stop your soil from spilling out of the planter to prevent weed growth, it is quite important to line the interior of the planter with Weed Sheets before you fill it with soil. To fit the fabric inside the planter, cut it to the appropriate size, leaving a few extra inches on each side to be safe, then you can carefully lay it in place ensuring a small about of material is hanging out of the sides.
Conclusion
In conclusion, making a planter with railway sleepers is a fun and rewarding DIY project that can add a rustic and natural touch to your garden. With the right tools and some basic carpentry skills, you can easily create a unique and durable planter that will be the envy of your neighbours.
Whether you're a seasoned DIY enthusiast or a beginner, this project is a great way to unleash your creativity and improve your outdoor space. So, gather your materials and get started on your planter today - you'll be amazed at what you can achieve with a little bit of time and effort!


